About image specifications


When preparing to submit images for publication on websites and magazines you will usually have been given precise specifications for the images in the form of properties such as file format (e.g. jpg), pixel dimensions, dpi, etc.
There are 6 different properties used to specify a digital image but as they are inter-related you may only be given two or three of them.
To explain two of them very simply:
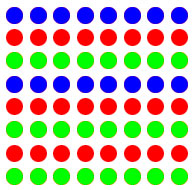
- Pixels are the coloured dots that make up an image. The more pixels, the bigger the image will appear on screen and when printed.
- Dpi (dots per image) is a measure of how close together the pixels are printed/displayed.
- A computer printer prints at 300dpi which is close enough for the eye not to see the gaps between the dots.
- A computer screen typically displays at 72dpi. As the pixels glow, the eye doesn’t see the gaps between them.
The following explains all six properties in detail. Click each property for an explanation.
 The pixel dimensions of an image are the number of coloured dots or pixels horizontally and vertically that form the image. 1024 x 768 means there are 1024 dots horizontally and 768 vertically – a total of 1024 x 768 = 786,432 pixels.
This is the most important property of an image as it determines how large the image will be when displayed on a screen and when printed on paper.
The resolution of an image is a measure of how close together its pixels are when displayed or printed. This effects how large and how sharp the image will appear on screen and when printed. A 72dpi (dots per inch) image means each horizontal and vertical inch of the image will be made up of 72 dots whereas a 300dpi image means each inch has 300 dots – much closer together.

A 200 x 200 pixel image displayed on screen at 72dpi appears 2.8in (inches) wide and high (200 ÷ 72).
The same image (i.e. 200 x 200 pixels) printed on paper at 300dpi is only 0.67in wide and high (200 ÷ 300).
On a computer screen (traditionally with a resolution of 72dpi) a 72dpi image will look sharp as the adjacent pixels glow and this bridges the gaps between them. But if the image is printed on paper at 72dpi the gaps between the dots are apparent and the image appears out of focus (‘pixellated’).
This explains why images are printed at 300dpi; the gaps between the dots are not so apparent. The reason 300dpi images are not used on websites is that they will have large file sizes which will increase the time the page takes to load and not look any sharper than a 72dpi image.
 The size of a printed image is determined by its pixel dimensions and its resolution.
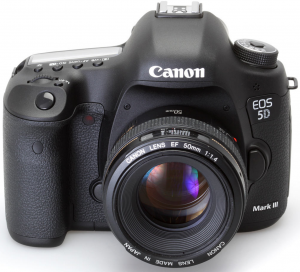
If an image is to be printed it needs to have a resolution of 300dpi otherwise it will appeared blurred. An image that has been converted to 300dpi has that information encoded in its file as an instruction that is read by the printer. Just changing the resolution of an image (e.g. from 72dpi to 300dpi) does not change the number of pixels – only how closely together they will be printed.
This means that the maximum size in inches of a printed image is set by the number of pixels it contains (pixels ÷ 300). If you try to print it larger than this it will be blurred as you will be forcing the dots to be further apart.
You can use a specialist graphics program, such as Photoshop, to force an image to print larger than that set by its pixel dimensions. The software will ‘resample’ the image and add extra pixels to keep the dpi at 300. The software is in effect ‘guessing’ what colour the inserted pixels should be which means the image won’t look as blurred as it would otherwise but may not be completely sharp.
![]()
The file format refers to how an image has been encoded as digital information. Jpg and gif encoding produces much smaller files than the others but they tend to be lower quality images. Smaller files make it easier to email images and when included on website pages make the pages load more quickly.
![]()
This refers to the amount of space needed to store the file. The smaller the file size of an image the less space it will take up on your hard drive or mobile phone and the quicker it will take to email as an attachment.
How to change image properties (pixels, size, dpi, etc.)
Changing the properties of an image is best done using a specialist graphics program such as Photoshop or Paintshop Pro.
However Windows and Mac computers come with free graphics programs (such Microsoft Paint on Windows and Preview on Macs) which can also be used but they are not as powerful as a specialist graphics program.
Windows users in particular should download paint.NET (download free from www.getpaint.net) in order to be able to change dpi as Microsoft Paint only enables you to change image dimensions.
The following section explains the general principles of changing image properties and applies to most makes of graphics programs.
To change properties you will need to find the graphics program’s ‘Image Size’ tool.
Graphics programs have a menu option such as ‘Image Size’ (under ‘Image’ in Photoshop) or ‘Adjust Size’ (under ‘Tools’ in Mac Preview) or ‘Resize’ (under ‘Image’ in Paint.NET).
Select this menu option to start the re-size tool.
How to change just the Pixel Dimensions of an image
It is advisable to only reduce the number of pixels in an image as increasing them will usually significantly reduce the image’s sharpness. If the number of pixels in your image is insufficient to produce the size of image you want, then you should re-photograph the object with your camera set to a higher quality.
To change the pixel dimensions of an image:
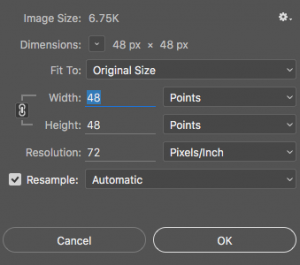
- Open the image resize tool and check the existing width/height dimensions (Note: pixels and points are the same unit)
- If you want the image to have smaller dimensions, make sure Resample is selected and change the Width/Height to the dimensions required.
- If you want the image to have larger dimensions ONLY RISK a 10 – 15% SIZE INCREASE or else the image quality will be reduced significantly. Make sure Resample is selected and change the Width/Height to the dimensions required.
- Click Ok and ‘Save as…’ your image (using a new name so you keep the original)
How to change just the Resolution (dpi) of an image

To change the resolution of an image, such as changing it from 72 dpi (images produced by most cameras) to 300 dpi (for printing):
- Open the resize tool and UNTICK Resample.
- Change the Resolution to 300 dpi.
- Now check what size the image will print at by changing the units of Width and Height from Points (same as Pixels) to Inches or Centimetres
How to change just the printed Dimensions of an image
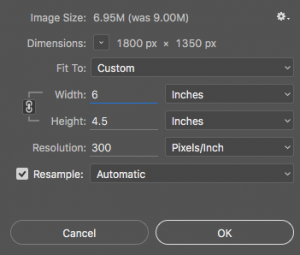
If you require an image to be printed at a specific size and assuming it already has a resolution of 300 dpi, then:
- Open the resize tool and check the existing width/height dimensions by changing the width/height units to the ones required (e.g. inches or centimetres)
- If you want the printed image to be a different size, TICK Resample and change the Width/Height to the size required. If the image is to be smaller, no problem. BUT ONLY RISK A 10 – 15% SIZE INCREASE or else the image quality will be reduced significantly.
- Click Ok and ‘Save as …’ your image.
Changing the Resolution and Dimensions at the same time
You can change an image’s resolution and dimensions at the same time using the image resize tool if you know that just changing the dpi produces an image that is too large.
But always check that you won’t be enlarging the image by first de-selecting Resample, then changing the resolution and seeing what print dimensions (inches or cm) will be produced.
Then ensure Resample is selected, reduce the dimensions, and click ‘OK’.
Explanations of other key concepts of image manipulation
File sizes of images – Tif images
The file size of an image is determined by a number of factors:
- The number of pixels in the image
- The format the image has been saved with (e.g. jpg or tif)
- If a jpg, then the quality the jpg has been saved at and the complexity of the image
File Sizes of images – JPG images
The jpg image file type was created in order to reduce the file size of images. It compresses the image data by specially encoding it using various procedures. Jpgs are typically about 10% of the size of the tif version.